Troubleshooting Websites and Web Applications
The following are the most common errors and problems that occur when working with Web/Windows App clients on Server with local web server (IIS) or on a remote web server (IIS) hosted on Client/FEP. This section provides information related to their causes and methods to resolve them.
Cannot Create Web Application
Problem: The web application creation or upgrade fails with a message.
Solution: Ensure that there are no multiple or invalid ClickOnce folders available at the path specified while creating website.
Problem: The website creation or save fails with a message.
Solution: The user must have Allow log on locally as Service right set.
To set Allow log on locally as a service right for a Windows local/domain user, do the following:
- From the Start menu, navigate to Control panel > Administrative tools > Local Security Policy.
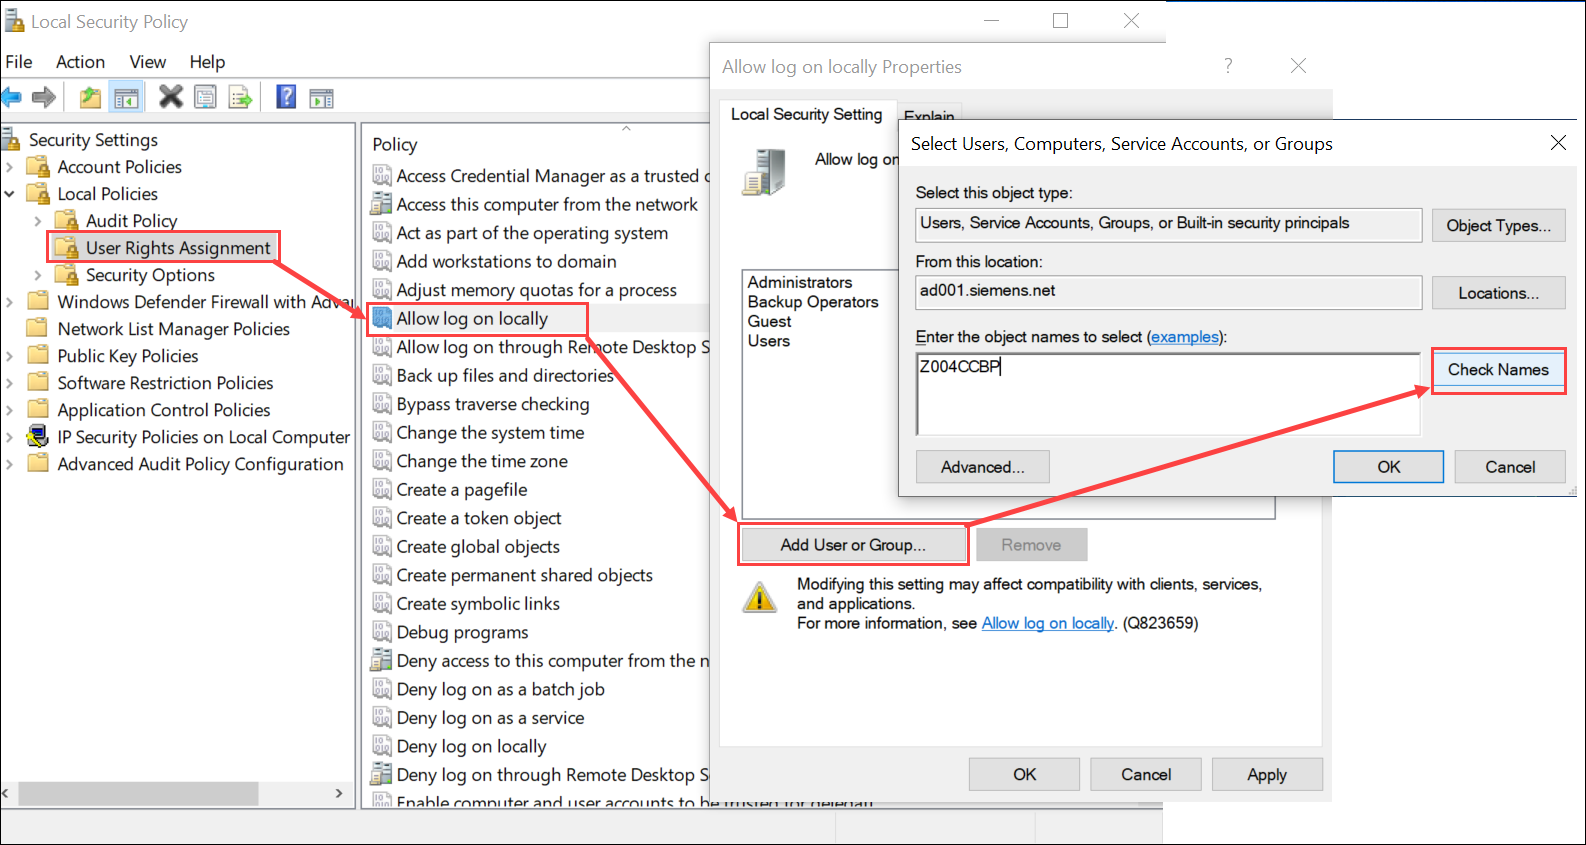
- In the Local Security Policy window, expand the Local Policies node and select User Rights Assignment.
- In User Rights Assignment, navigate to the Allow log on locally as a service policy.
- Double-click Allow log on locally as a service. The Allow log on locally Properties window opens.
- Click Add User or Group.
- In the Select Users, Computers, Service Accounts, or Groups dialog box, type [Machine name\User name] and click Check Names and confirm.
- Click OK.
The Allow log on locally as a service right is set for the selected Windows local/domain user.
Problem: After clicking the website or web application hyperlink, you cannot access the Desigo CC web page.
Solution: Perform any of the listed solutions as required:
- For launching the Desigo CC web page, IIS must be installed and configured as per the operating system you are working with, ARR must be installed, and its proxy must be enabled. Note that during installation, the installer installs ARR, and the SMC internally enables the proxy for ARR when you save the website or when you click Edit
 and save the third-party website. However, if you still cannot launch the Desigo CC web page, see Cannot launch System Web page with HTTP 500 Internal Server error.
 - Make sure you use the proper URL for the server. The URL is https://[Host name]:[HTTPS port number]/[Web application name].
For example, https://ABCXY022PC.dom01.company.net:4343/WebAppplication1. - Confirm that you can ping the Server by hostname. In a command window, type ping HOSTNAME. If the host is unavailable, add an entry in the hosts file for the Server located at the path C:\Windows\System32\drivers\etc\hosts.
Alternatively, you work with your System Administrator to ensure the hostname is resolvable through DNS. - On launching the Windows App client, if you get a
Connecting to the Servererror message, see the troubleshooting section Connecting to the Server Error. - In the Windows Services applet on the Server, make sure the World Wide Web Publishing service is running.
- Verify that Windows Firewall and any network firewalls between the Client and Server have the proper ports open as specified in Configuring Windows Firewall Settings.
- Repeat the steps in the Installing IIS section to make sure IIS is configured properly.
- Complete the steps in the Confirming Web Site Settings section.
- If a blank web page for a web application or a website launches, or if the Desigo CC web page for a website launches but with the error message:
Server error in application [website name, or you get the error messageHTTP Error 500.19orHTTP Error 500.21, you must repair the .NET Framework 4.0.30319 version at a command prompt. - This error occurs because the Microsoft .NET Framework 4.0 configuration for ASP .NET has been damaged. This can occur when Microsoft .NET Framework 4.0 and later is installed after IIS is configured, or when the version of .Net you use is not registered with IIS correctly. If the version of .Net you use is not registered with IIS and you have .Net version 4 on a 64-bit 2008 Server, you must start the command prompt in administrator mode and run the following commands in the command prompt to fix it.
cd %windir%\Microsoft.NET\Framework\v4.0.30319aspnet_regiis.exe –Icd %windir%\Microsoft.NET\Framework64\v4.0.30319aspnet_regiis.exe –Iiisreset /RESTART - If you get
HTTP Error404, verify that the web application is not on the same or on a different root drive as that of the third-party website under which the web application is created.
For example, if you have an existing third-party website on root drive, D, you must not create a web application under this website on the same or any other root drive. Otherwise, you cannot launch the Desigo CC web page. - Confirm the website/web application user and password. If the password has changed, you must modify the website/Web application, and enter the most recent user password. This applies to all the extensions’ web application.
- Check the path where the web application is created. If it is created using a third-party website that was created on a root drive, you cannot launch the web page and an
HTTP error404 message displays. - Confirm that the ports configured for http and https are open in the firewall. If not, change your firewall configuration to open these ports as described in Configuring Windows Firewall Settings.
- Verify that IIS is not corrupted. Otherwise you must re-install IIS.
- If the website creation fails, verify the security rights on the parent folder where the websites reside.
If you still cannot connect to the Desigo CC web page, contact Customer Support.
Problem: On launching the Windows App Client, you get a Connecting to the Server error message.
Solution: Perform the following steps:
- Check if the project's Pmon service is started.
- Verify if the proxy is enabled for the Application Request Routing (ARR) Cache in IIS.
- Repair Application Request Routing (ARR) by re-running the prerequisite Microsoft Application Request Routing (ARR). You can get more information as well as download the prerequisite Microsoft Application Request Routing from the link http://www.microsoft.com/en-us/download/details.aspx?id=40813.
- Verify on Server, if the Web communication setting for the CCom port is
Disabled. It is recommended to set it to Secured/Local. - Check if the self-signed certificate or the root certificate of the host certificate used while creating a website is available in the Windows store (Trusted Root Certification Authorities) of the machine where Windows App Client is accessed. Similarly, if the root certificate of the host certificate used while creating a Web application is present in the Windows store (Trusted Root Certification Authorities) where it is accessed. If it is not available, you need to perform one of the following:
- On A Client/FEP SMC machine where you are accessing Windows App Client, you need to import these (root or self-signed) certificates using Microsoft Management Console (MMC 3.0).
- On an SMC machine, import these (root or self-signed) certificates using Import
 .
.
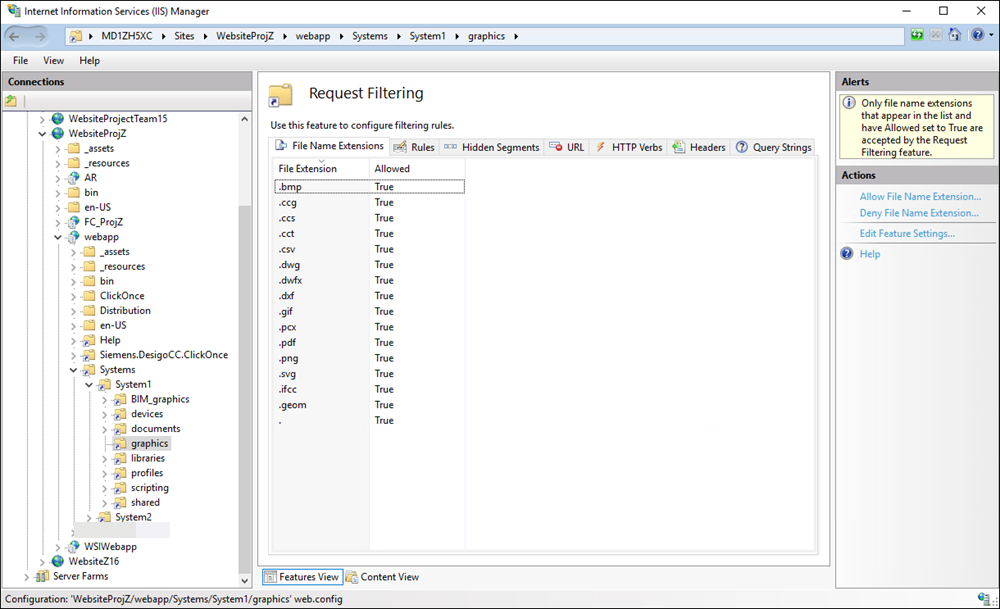
Problem: File Transfer Between a Web Server (IIS) and a Windows App Client Fails with HTTP 404 Error Code
Solution: The web server (IIS) provides Windows App clients access to files in the project directory. Since file transfer is a potential security risk, file transfer via IIS is restricted to specific file types. The restriction is set only on those virtual directories in IIS that provide write access to clients. IIS responds with an HTTP 404 error, if a client attempts to access or to upload a file of a different type. Depending on the workflow this error gets reported to the operator at the client, or gets added to the log file on the server.
A list of such allowed file types is maintained in a web.config file of a virtual directory under
[Installation drive:]\[Installation folder]\[Project folder]\[VirtualDirectoryFolder] .
The Virtual Directory Folder can be devices, graphics, libraries and profiles.
List of Allowed File Types for Transfer | |
Virtual Directory Name | Allowed File Types |
devices | *.snmp |
graphics | *.bmp |
libraries | *.avi |
profiles | *.ldl |

NOTE:
Extension modules can add further virtual directories with different file type restrictions to the web application.
The allowed file types for each virtual directory mentioned in the web.config file are also configured in IIS using the Request Filtering feature, thus ensuring file transfer only for the specified file types. Note that no request filtering is configured for the shared and documents virtual directories as these are read-only directories. To view the allowed file types for a virtual directory in IIS, do the following:
- From the Windows Start menu, select Control Panel.
- Double-click Administrative Tools, and double-click Internet Information Services (IIS) Manager.
- In the IIS Manager window, expand the node for your Web Server in the Connections pane and expand Sites > [Website Name] > [Web Application Name] > [Virtual Directory Name].
- Select the Request Filtering feature and from the Actions pane, click Open Feature.
- The configured file types for the selected virtual directory display.
Problem: While creating or modifying a website or web application, a chain validity message displays.
Solution: Check the following:
- If you selected a host certificate, you need ensure
- The host certificate (.pfx) is imported in the Personal store,
its Private Key is exportable and imported in the Personal store. - Its root (.cer file) in the Trusted Root Certification Authorities store of Local machine certificates.
- If Self-signed certificate is used for website/web application creation then it must be imported in the Personal, as well as the Trusted Root Certification Authorities store of Local machine certificates in the Windows Certificate store.
- This message always displays if you use a host certificate for creating a website. You should ignore it.
- For working with the Windows App client on a remote machine other than the web server (IIS): You have imported the root certificate (.cer file) of the host certificate used for website/web application creation in the Trusted Root Certification Authorities store of Local machine certificates store in the Windows Certificate store of the machine where you are launching the Windows App client. Otherwise, you will not be able to launch the Windows App client.
Problem: While browsing a website URL a Network Error (dns_unresolved_hostname) displays.
Cause: The host certificate used for the website creation is issued for the host name provided in the Host name field and even if a message displays informing you that you may not be able to work with the Web/WindowsApp client, you proceed, and attempt to browse to that website
Solution: Make sure that the host certificate used for the website creation is issued for the host name provided in the Host name field. If not, then select another certificate with host name provided in the Host name field.
Problem: IIS is corrupted.
Solution: Re-install IIS by performing the following steps:
- From Control Panel > Programs and Features, click Turn Windows feature on or off.
- In the window that displays do the following:
- Deselect Internet Information Services to uninstall IIS completely.
- Deselect Windows Process Activation Service.
- Click OK.
- Restart the computer.
- Make sure %windir%\system32\inetsrv\ is now clean.
- Reinstall IIS.
- Reinstall Windows Process Activation Service.
- If the website certificates are not installed, refer to Installing the Website Certificate.
- After you launch the website URL if you continue to get the Certificate Error as follows.
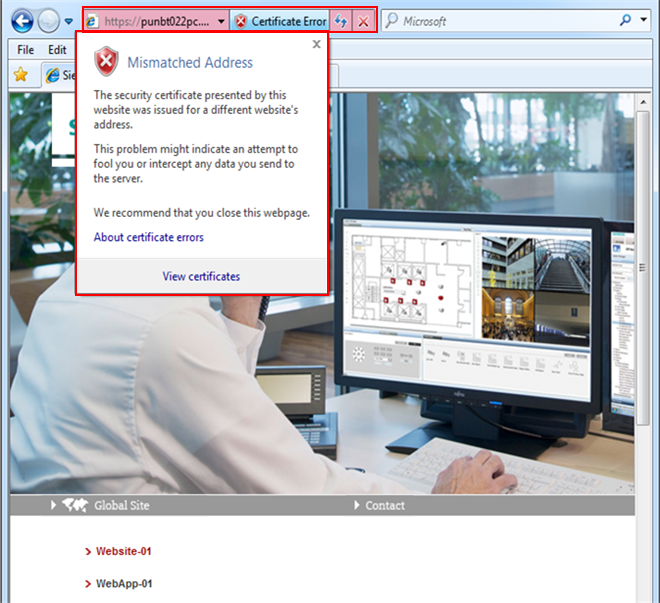
You must ensure that the Subject Alternative Name (SAN) property of this certificate contains the host name provided at the creation of the website. For example, if the website Host name field contains the full computer name, ABCXY022PC.dom01.company.net, the certificate provided in the Certificate issued to field must contain the full computer name as one of its name in the SAN.
This error may be due to the changed website/application user password or due to installation of an updated .Net Framework version (version 4.7.2).
Solution 1: On Windows 10 operating systems, ensure that the website/web application user or the user group to which the website/web application user belongs to is not added in local policy for Deny access to this computer from the network. Otherwise, you cannot create a web application under this website (which is created from local windows user).
For this you must remove the web site user (local windows user) from Deny access to this computer from the network. In case you don’t have rights to remove local account as shown in the image, do the following steps to remove the required account (for example, Local account):
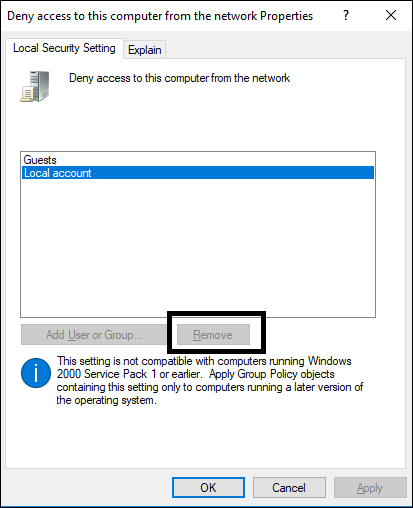
- Open Command Prompt with admin rights and navigate to any known directory (for example, C:\temp)
- Type: secedit /export /cfg initial.cfg.
- A initial.cfg file is created in the current directory.
- Open initial.cfg in an editor such as Notepad and locate SeDenyNetworkLogonRight.

- Remove Local account (*S-1-5-113) from that list and save initial.cfg file.
- Now type user command:
secedit /configure /db final.db /cfg initial.cfg /overwrite /areas USER_RIGHTS
- Type y for confirmation.
- Re-start the computer, if the command gets executed successfully.
- Verify your local policy for Deny access to this computer from the network.
- It is been updated.
- Now create a website using SMC.
Solution 2: Perform the following steps:
- In the SMC tree, from Websites, select the Website/application.
- Click Edit .
- Enter the most recent password.
- Click Save
 .
.
- The website/application user password is updated.
- Browse the website/web application to launch the Desigo CC web page.
- (Required only when you still do not get the Desigo CC web page) Configure IIS.
NOTE: A message may display asking you to re-start the computer.
- In IIS, check under IIS section, if Application Request Routing is available. If not, you must re-install ARR by executing the ARR setup exe (ARRv3_setup_amd64_en-us.EXE) from the distribution media.
- Reset IIS by typing the iisreset command in the command prompt.
- Launch the SMC.
- In the SMC tree, from Websites, create a website or web application and click the hyperlink to launch the web page. Note that the SMC does not restore the websites or web applications after re-installing IIS; neither can you restore them using IIS. However, these websites and web applications folders are available on the disk.