Customizing a Journaling Template
Scenario: You want to modify the default template, the UL template, or create a user-defined template.
Reference: For background information, see the reference section.
Workflow diagram:
Prerequisites:
- System Manager is in Engineering mode.
- System Browser is in Management View.
Steps:
To create a user-defined template make a copy of a default or UL template in the …\profiles\JournalingUsertemplates and rename it, for example as user_defined-template.xml.
- In Windows, navigate to the project profiles folder:
[installation drive:]\[installation folder]\[project]\profiles.
- Locate the journaling template file you want to modify at one of the following:
- Default template:
…\profiles\DefaultJournalingtemplate.xml
- UL template:
…\profiles\JournalingUsertemplates\Journalingtemplate_UL.xml
- User-defined template:
…\profiles\JournalingUsertemplates\[user_defined-template.xml]
- Open the xml journaling template file with a text editor such as Notepad, or code editor such as Visual Studio.
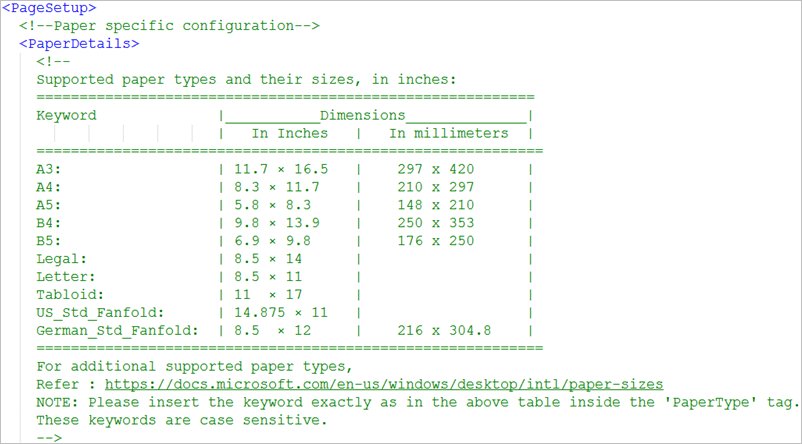
The default paper type is A4. To specify additional supported paper types, see supported paper types.
- In the <PageSetup> section of the template file, navigate to the <PaperDetails> section.
- Within the <PaperType> tag, enter the exact paper type (Keyword) as in the Paper Details section. For example, <PaperType>A4</PaperType>.

NOTE:
Based on the server printer configured and/or the paper type selected for journaling, you may need to adjust the printer’s default settings as recommended in the printer’s manual.
For printer EPSON 2090, the front and rear tractor settings must be adjusted according to the dimensions of the paper type selected.
For example, for Paper Type = German_Std_Fanfold, you must set the following settings (by changing the default 11 inches) using the EPSON 2090 printer’s control panel default-setting mode.
- Page length for front tractor = 12 inches
- Page length for rear tractor = 12 inches
For more information on how to change printer’s default settings, refer to the Epson LQ_2090 Printer’s User Guide.
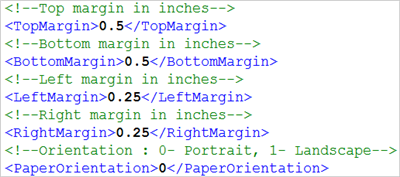
- In the <PaperDetails> section of the template file, enter the values for top, bottom, left, and right margins within the <TopMargin>, <BottomMargin>, <LeftMargin>, and <RightMargin> tags.
In the following code snippet, the top and bottom margins are set to 0.5 inches and left and right margins to 0.25 inches.
- Enter 0 for portrait or 1 for landscape within the <PaperOrientation> tag. For example, <PaperOrientation>0</PaperOrientation>.
NOTE: Evenif you set the margins values to 0, <TopMargin>, <BottomMargin>, <LeftMargin>, and <RightMargin>, the printer’s default margin is always be considered while printing.
The journaling fonts are applicable only for the page printer.
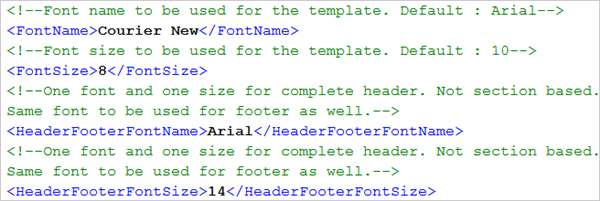
- In the <PaperDetails> section of the template file, enter the font name and size within the <FontName> and <FontSize> tags.
- To set the font name and size for the header and footer: enter the font name and size within the <HeaderFooterFontName> and <HeaderFooterFontSize> tags.
NOTE:
For printing Asian characters using a page printer, you must select TrueType fonts which support Asian characters, for example, Arial Unicode MS.
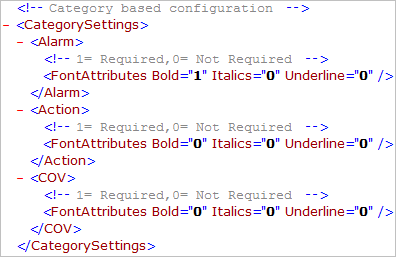
You can also specify the format (bold, italics, or underline) of the printable text according to the type of generated event (Alarm, Action, or COV) in the <CategorySettings> tag. For example, if you want a bold font with no italics and underline format for all Alarm type events, complete the following steps:
- Open the Default or UL template using an editor, such as Notepad or Visual Studio.
- Navigate to the <Alarm> tag in the <CategorySettings> section.
- In <FontAttributes>, specify 1 for the Bold attribute, and 0 for Italics and Underline attributes.
- All events of type Alarm are printed with a bold format.
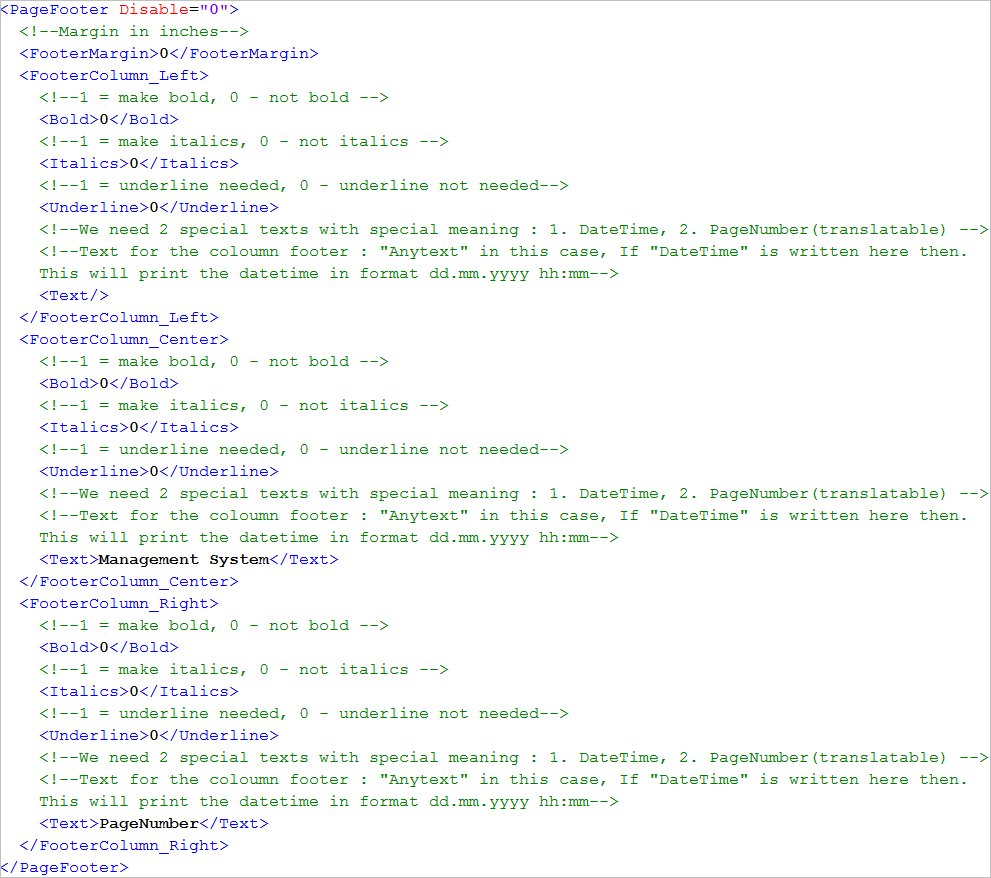
- In the <PageSetp> section of the template file, navigate to the <PageHeader> section.
- (Optional) In <PageHeader>, specify Disable = “1” to disable the page header in the print out, and Disable = “0” to enable the Page Header in the print out. The default is Disable = “0”.
- Enter a value, in inches, for the top header margin within the <HeaderMargin> tag.
- Specify the text to be displayed in the left header column by entering the value within the <Text> tag in the <HeaderColumn_Left> tag.
- Specify the formatting options (Bold, Italics, Underline) for the text by entering either 0 (normal text) or 1 (formatted text) within the <Bold>, <Italics>, or <Underline> tags in the <HeaderColumn_Left> tag.
- Repeat steps 2 to 5 to set the text and their corresponding formatting options for the center and right header columns using the <HeaderColumn_Center> and <HeaderColumn_Right> tags respectively.
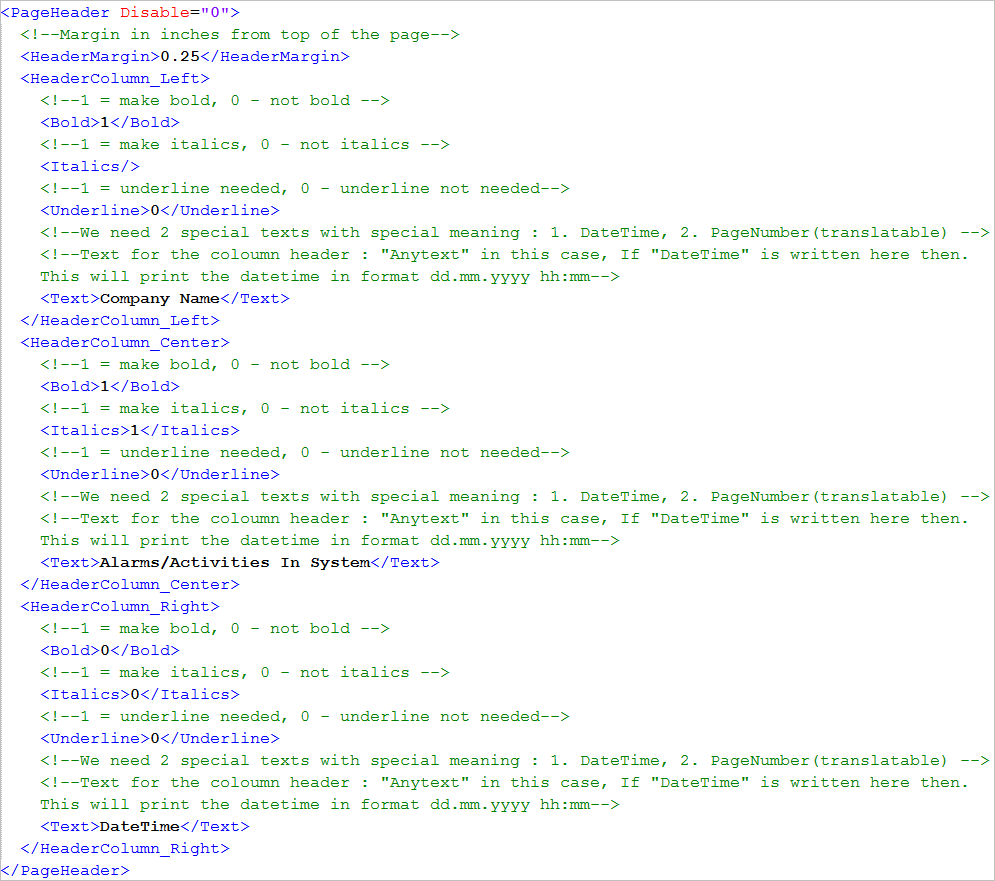
- In the <PageSetp> section of the template file, navigate to the <PageFooter> section.
- (Optional) In <PageFooter>, specify Disable = “1” to disable the page footer in the print out, and Disable= “0” to enable the page footer in the print out. The default is Disable = “0”.
- Enter a value, in inches, for the footer margin within the <FooterMargin> tag.
- Specify the text to be displayed in the left footer column by entering the value within the <Text> tag in the <FooterColumn_Left> tag.
- Specify the formatting options (Bold, Italics, Underline) for the text by entering either 0 (normal text) or 1 (formatted text) within the <Bold>, <Italics>, or <Underline> tags in the <FooterColumn_Left> tag.
- Repeat steps 2 to 5 to set the text and their corresponding formatting options for the center and right footer columns using the <FooterColumn_Center> and <FooterColumn_Right> tags respectively.
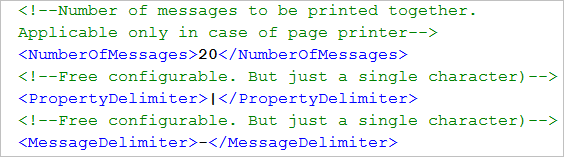
This is applicable only for page printers.
- In the <PageSetp> section of the template file, navigate to the <PaperDetails> section.
- Enter the value for the total number of messages to print in the <NumberOfMessages> tag. You can also specify the delimiters for separating the columns and messages by entering the respective characters within the <PropertyDelimiter> and <MessageDelimiter> tags.
You can specify the language in which you want to print the localized equivalent text defined in the textgroups by entering the language id in the <LanguageId> tag. For example, if you want the text to print in French, complete the following step:
- In the <PageSetp> section of the template file, navigate to the <LanguageId> tag of the template file and enter fr_CA.utf8 within the opening and closing tags.

You can configure each printable column using the <PrintColumn> tag in the <ColumnsForPrinting> tag.
Each attribute in <PrintColumn> enables you to provide information such as the column name, content, index, alignment, and width.
- In the <Columns> section of the template file, navigate to <ColumnsForPrinting> section.
- (Optional) In <ColumnsForPrinting>, specify DisableColumnHeader = “1” to disable the column header in the print out, and DisableColumnHeader = “0” to enable the column header in the print out. The default is DisableColumnHeader = “0”.
- (Optional) In <ColumnsForPrinting>, specify PrintOnlyAlertGoneCreated = “1” to print all alert state printout except alert gone and alert created in the print out, and PrintOnlyAlertGoneCreated = “0” to print all alter state. The default is PrintOnlyAlertGoneCreated = “0”.
- (Optional) In case of line printer, when <PageHeader>, <PageFooter> and <ColumnsForPrinting> are disabled, that is attribute value is = “1” and in <ColumnsForPrinting>, you can specify DisableFormFeed = “1” to disable page break in the print out, and DisableFormFeed = “0” to enable the page break in the print out. The default is DisableFormFeed = “0”.
- In the <PrintColumn> section, proceed as follows:
- Enter the value for the <ColumnHeaderText> tag which is the name of a printable column, for example Event Occurrence Time.
- The fields to be used in case of Alarms, Actions and COV, must be specified within the <AlarmColumnId>, <ActionColumnId>, or <COVColumnId> tags respectively.
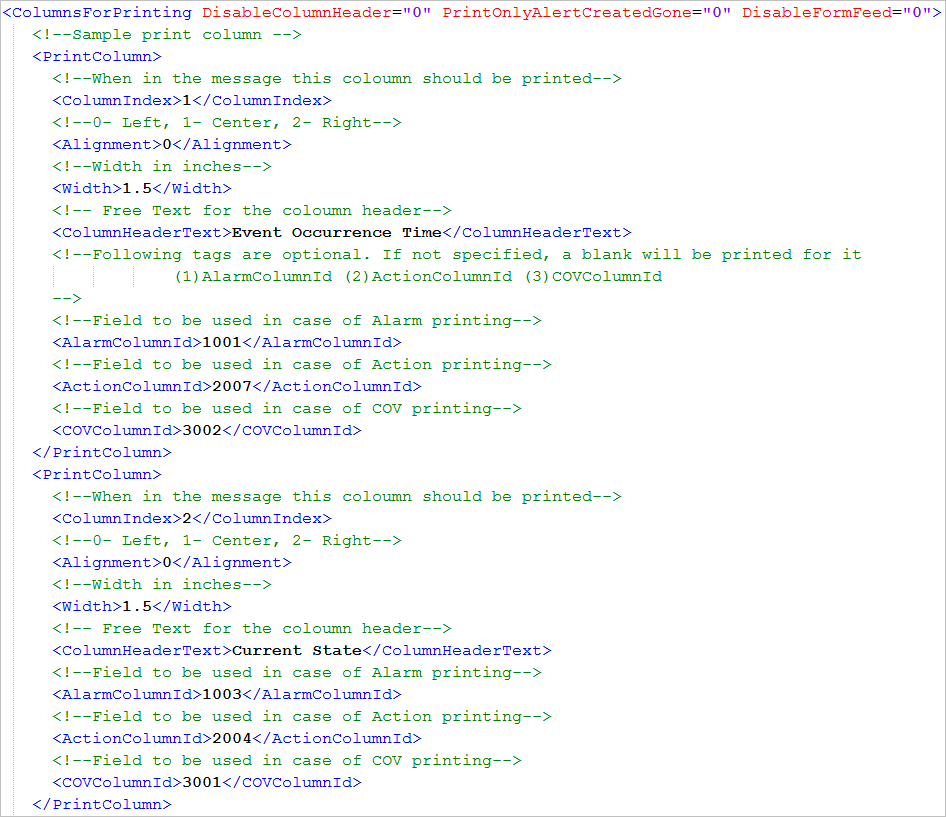
- To specify the column index, alignment, and width use the <ColumnIndex>, <Alignment>, and <Width> tags respectively. For example, in the template section Event Occurrence Time column is configured to have a column index value as 1 which indicates that this is the first column, is left aligned, and is 1.5 inches wide.
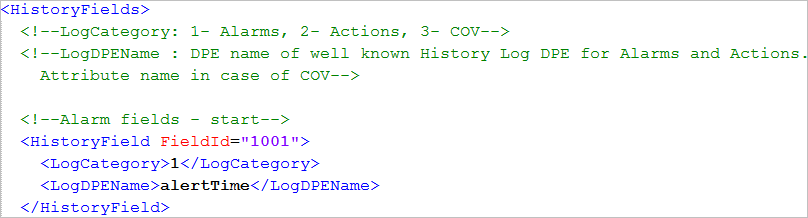
- In the <Columns> section of the template file, navigate to the <HistoryFields> section.
- Depending on the type of event (Alarm, Action, or COV), the information corresponding to the <LogDPEName> tag in the <HistoryField> tag displays.
- In the History Field_Alarm example, if an event of type Alarm occurs, and you have specified 1001 in <AlarmColumnId>, then the alertTime displays.
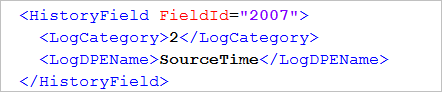
- If an Action type event occurs, and you have specified 2007 in <ActionColumnId>, then the SourceTime displays.
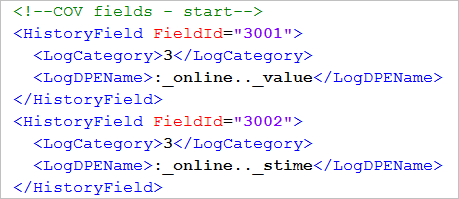
- If a COV type event occurs, and the value in <COVColumnId> is 3002, then the time at which the change of value occurred displays.
- In the <Columns> section of the template file, navigate to <ObjectNameColumnOption> and <ObjectPathColumnOption> tags, and type a value to specify the format in which the object name and its source path are printed. The following two code snippets provide the formats for the object name and source path.
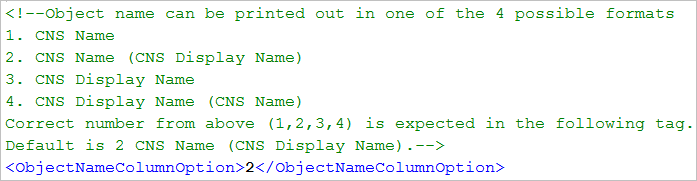

In the ObjectPathColumnOption example, the object source path prints along with the Common Naming System (CNS) display name. If you enter 1 as the value, the object source path prints along with the CNS name.
CNS defines how objects are displayed in System Browser. CNS Name is the name of the object and CNS Display Name is the object description.
- Depending on the type of event generated, the following information can be printed.
Fields for Event Types | |||||
Alarm | Value IDs | Action | Value IDs | COV | Value IDs |
Alert Time | 1001 | User Name | 2001 | Value | 3001 |
Alert Counter | 1002 | WorkStation | 2002 | Timestamp | 3002 |
Alert State | 1003 | SourceDpName | 2003 | Name of DP (SourceDP) | 3003 |
Alert Transition Time | 1004 | Action | 2004 | SourceDP Path | 3004 |
Alert Source DPE | 1005 | Message | 2005 | COVDPAlias | 3005 |
Alert Category | 1006 | Status | 2006 |
|
|
Alert EventId | 1007 | SourceTime | 2007 |
|
|
Alert Went Message | 1008 | LogType | 2008 |
|
|
Alert Mode | 1009 | Value | 2009 |
|
|
Alert Event Cause Message | 1010 | PreviousValue | 2010 |
|
|
Alert User | 1011 | SourceDpName2 | 2011 |
|
|
Alert Value | 1012 | Action Source Path | 2012 |
|
|
Alert Event Message | 1013 | Action Source Path2 | 2013 |
|
|
Alert Went | 1014 | ErrorMessage | 2014 |
|
|
Alert Gone | 1015 | ActionDPAlias | 2015 |
|
|
Alert Source Path | 1016 |
|
|
|
|
Alert Observer | 1017 |
|
|
|
|
Alert Observer Path | 1018 |
|
|
|
|
AlarmDPAlias | 1019 |
|
|
|
|
Device Text | 1020 |
|
|
|
|
NOTE:
If the journaling printout does not contain information from any of the fields that are listed in the Fields for Event Types table, then you must explicitly add a <PrintColumn> section for each of those fields. However, the information related to the AlarmColumnId, ActionColumnId, and COVColumnId for such fields is present in the template in the <HistoryFields> section.
In order to apply the configured parameters of the default, UL, and user-defined templates to journaling printouts, you need to complete the following steps:
- You have made changes in the Journalingtemplate_UL.xml file available in the folder
[installation drive:]\[installation folder]\[project]\profiles\JournalingUsertemplates or
the user-defined template file available under
[installation drive:]\[installation folder]\[project]\profiles\JournalingUsertemplates or
the DefaultJournalingtemplate.xml file available in the folder
[installation drive:]\[installation folder]\[project]\profiles.
- Select Project > System Settings > Journaling.
- In the Journaling Printers tab, select the printer-template mapping to which you want to update the changes.
- Click Apply
 .
.
- The changes configured in the template are reflected in the journaling printouts.